I don't really care how long the gap has been or how many people actually read this blog, but I realized a few weeks ago, I like doing it. I really like writing about the food I make and eat with my friends and family and I love sharing recipes and photos to go along with them.
So even if no one reads this, I'm going to try and keep it updated anyway. Because a few nights ago I was going through all the recipes I've posted thus far and realized what a good resource this is. The recipes I posted two years ago are the recipes I still want to make now, especially after losing 85 lbs. I think dieting put a real damper on recording recipes here because I only ate desserts every once in a while. I felt guilty for posting a high-calorie, high fat recipe when I was dieting because that's not what I ate every day. Now I eat a cookie or baked good (almost) every day, and I bake 3-5 times a week rather than 1. Granted the cookies are smaller and the cakes might include more whole wheat flour and less butter now, but they still taste delicious and deserve to be shared.
Anyway, this summer was absolutely fantastic. But the end of August and the beginning of September were a bit rough - two baby showers in the span of one week for my sister-in-law, I got pretty sick right after that and couldn't sleep for days let alone eat normal food. But things are back to normal now. It's fall, it's not too hot to turn on the oven, and I have plenty of new recipes to share. Or just record for my own future use :)
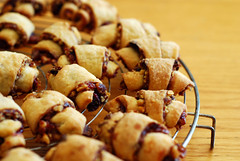
Starting where I left off, this is part of what I made for brunch back on Mother's Day 2010. These were absolutely delicious and I highly recommend this recipe to anyone looking for a lightened-up sticky bun. I have one of Cooking Light's cinnamon roll recipes bookmarked the next time I feel like making a morning sweet roll like this, but if you're into the sticky bun, try these. I added a bit more salt to the dough (undersalted yeast doughs should be addressed in every baking book... salt is soooo important for the flavor in yeast doughs) and switched out the figs for dates because my mom and I adore dates. Feel free to use any dried fruit/nut combination you'd like - dried cherries are probably my favorite dried fruit at the moment so I'm imagining those with some pecans, dried blueberries with hazelnuts, dried apricots with sliced almonds, etc. The possibilities are endless :)
Date-Walnut Sticky Buns
Adapted from
Cooking Light
Dough:
2 tablespoons granulated sugar
1 package (2 1/4 teaspoons) yeast (I use active dry)
2/3 cup warm water (100 degrees)
3 tablespoons unsalted butter, melted
7.9 ounces all-purpose flour (about 1 3/4 cups)
1 teaspoon kosher salt
1/4 teaspoon ground nutmeg
2 tablespoons unsalted butter, melted, for brushing on rolled dough
Sticky topping:
3/4 cup brown sugar, divided
2 tablespoons dark corn syrup
2 tablespoons milk
1/2 cup finely chopped, pitted dates
1/4 cup finely chopped walnuts
2 teaspoons ground cinnamon
For the dough, dissolve the granulated sugar and yeast in the warm water and let stand until foamy, about 5 minutes. Stir in the melted butter.
Combine 6.75 ounces of the flour (about 1 1/2 cups), salt and nutmeg in a bowl, stirring with a whisk while adding the yeast mixture and forming a sticky dough. Knead dough either by hand or in a mixer until elastic, about 5 minutes and add the rest of the flour about a tablespoon at a time. Place the dough in an oil or cooking spray-coated bowl, turning so the entire ball of dough is lightly coated and cover with plastic wrap. Let rise in a warm place until doubled in size. (I always use my oven for this, it has a bread proofing setting but even if you put it in a turned off oven, it's probably still warmer and more draft-free than a countertop.)
Combine 1/2 cup brown sugar, syrup, and milk in a small saucepan and bring this mixture to a boil. Remove the pan from heat and add in the dates. Sprinkle the nuts evenly on the bottom of a cooking spray-coated 9x13 inch baking pan. Spread the date mixture over the nuts as evenly as you possibly can, I used a small offset spatula for this and it helped. It might not seem like there's enough to go around, but I promise there is.
Combine the other 1/4 cup of brown sugar and cinnamon in a small bowl.
Preheat oven to 375 degrees F. Punch down your dough (I should talk about this term some time... you never want to PUNCH the dough down, more like fold it over itself so most of the air bubbles go out of it) and let it chill out for 5 minutes to rest. Roll the dough out to a 12x10 inch rectangle on a lightly floured surface and brush with the 2 tablespoons melted butter. Sprinkle the dough with the brown sugar/cinnamon mixture and roll up tightly starting with the long end. Cut the dough into about 1-inch slices, creating 12 rolls. Place the rolls cut-side up in the baking pan and cover with plastic wrap. Let rise until the rolls touch each other and have doubled in size, about 15-20 minutes.
Bake at 375 degrees F. for about 15 minutes or until lightly browned. Cool the buns on a wire rack for 5 minutes before inverting onto a serving platter and eating, still warm from the oven :)