Monday, December 8, 2008

White Chocolate Egg Nog Mousse Cake.

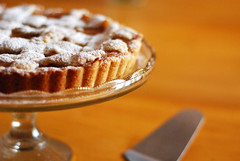
Oh hey. So it's almost mid-December, and absolutely holiday baking time. I was asked to make a dessert for my sister's boyfriend's mother's (yeaaahh) dessert party. It didn't take me long to look through my books and find this cake to know it was the one I would make.

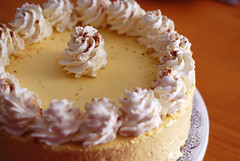
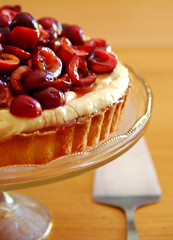
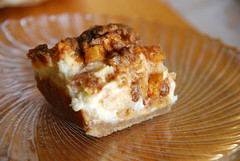
White chocolate eggnog mousse cake. Peerrrfect. So festive and the eggnog intrigued me. I can't say I've ever been a fan of eggnog or rum or alcohol in general, but people at holiday parties do, right? I told my sister this was the recipe I had chosen and she said everyone would love it.

So I work 40 hours a week, and this recipe was dissected for convenience as all recipes should be. I made the cake a week ahead of time and froze it. Two days ahead of time I made the mousse and assembled the cake, then froze it. The day of the party I topped it with the whipped cream.

This recipe is from Tish Boyle's "The Cake Book" and what a great book it is. She has a system for rating how difficult a recipe is using little cake slices. 1 equals an easy cake, and 4 equals a rather difficult cake to make. This one has 4 slices, but it's easy if you take apart the pieces and don't try to do everything on the same day, okay?

White Chocolate Egg Nog Mousse Cake.

Therefore,
White Chocolate Eggnog Mousse Cake adapted from The Cake Book by Tish Boyle

Spiced Chiffon Cake
1 1/4 cups sifted cake flour
1/2 teaspoon ground cinnamon
1/4 teaspoon ground ginger
1/4 teaspoon ground cloves
1/4 teaspoon ground nutmeg
3/4 cup granulated sugar, divided
1 1/2 teaspoons baking powder
1/4 teaspoon salt
3 large eggs at room temperature
1/3 cup water
1/4 cup vegetable or canola oil
1 teaspoon vanilla extract
1 large egg white
1/4 teaspoon cream of tartar

Preheat the oven to 325 degrees and line the bottom of a 9-inch springform pan with parchment, and then spray the parchment paper with baking spray.

Sift the flour, 1/2 cup of the sugar, the spices, baking powder and salt together.

In a large bowl whisk the egg yolks, water, oil, and vanilla extract until combined and then add the flour mixture one-third at a time.

Using an electric mixer or whatever you find easier, whisk the four egg whites and cream of tartar at medium speed until soft peaks form. Gradually beat in the remaining 1/4 cup of sugar and beat until the whites are stiff but not dry. Using a large spatula, fold in the whites to the yolk mixture a little at a time. Scrape the batter into the pan and smooth the top.

Bake 28 to 35 minutes (mine took a little longer), until a toothpick comes out clean. Run a paring knife around the edge of the pan to loosen the cake and let it cool in the pan for 20 minutes. Take the cake out and if you're making it in advance, wrap it well in plastic wrap and freeze it after it's cooled completely.
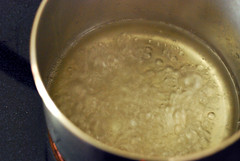
Rum Syrup
1/2 cup sugar
1/2 cup water
3 tablespoons dark rum

Bring the sugar and water to a boil, dissolving the sugar. Remove from the heat and add the rum. Set aside to cool.

White Chocolate Eggnog Mousse
3.5 ounces white chocolate, chopped (I just used a 4 ounce bar... figured why not? Haha.)
1/4 cup dark rum, divided
1 1/2 teaspoons powdered gelatin
6 large egg yolks
2/3 cup granulated sugar
2 teaspoons vanilla extract
1/2 teaspoon grated nutmeg
1 1/2 cups heavy cream

First melt the white chocolate in a medium bowl and set aside.

Pour 3 tablespoons of the rum into a small heatproof bowl and sprinkle the gelatin on top and set aside for about 5 minutes.

In a large bowl whisk together the yolks, sugar and remaining tablespoon of rum. Set the bowl over a pot filled about 1/3 of the way with simmering water and heat, and whisk until it reaches 160 degrees F. Remove from the water and whisk in the vanilla and nutmeg.

Now take the cup with the rum and gelatin in it and put it in the pot of water, heat turned off, and stir it to dissolve the gelatin. Whisk the rum mixture into the yolk mixture, and then the yolk mixture into the white chocolate.

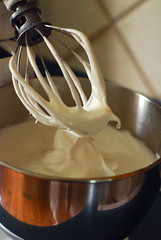
Whisk the heavy cream until firm peaks just begin to form and fold this, about one-third at a time, into the yolk mixture.

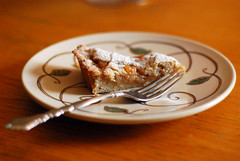
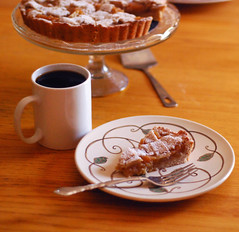
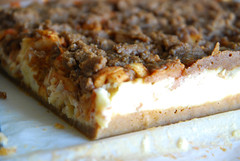
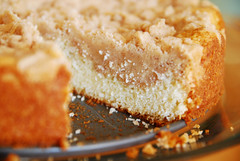
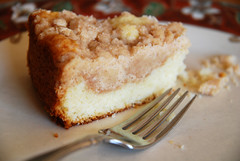
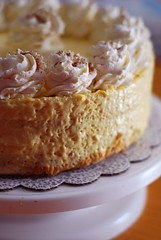
To assemble the cake, slice it in half using a serrated knife and place it in the bottom of the same springform pan you used to bake it in. Use half the rum syrup and brush it all over the cake, letting it soak in. Then pour 2 cups of the mousse over the cake, letting it go down the sides of the pan. Then place the other half of the cake on top of this, brush it again with the rum, and finish the rest of the mousse and use it all on top and the sides of the cake. You should refrigerate this now for at least 4 hours or freeze it.

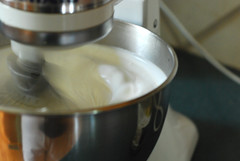
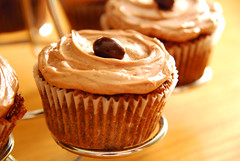
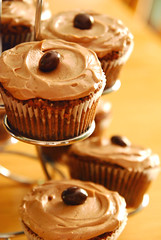
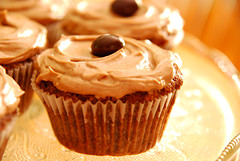
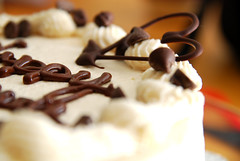
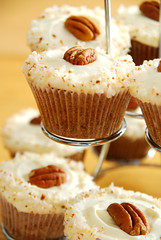
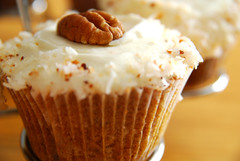
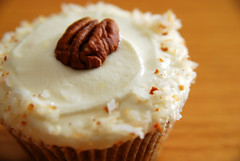
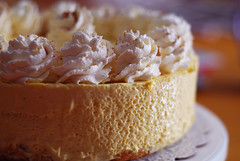
To finish the cake, whip 1 cup of heavy cream, 2 tablespoons confectioner's sugar and 1/2 teaspoon vanilla together until firm peaks form. You could just spoon this on top, I used a large start tip to pipe it around the edges. Then garnish with some ground nutmeg and voila. You have yourself a perfect holiday cake.

White Chocolate Egg Nog Mousse Cake.

Monday, November 3, 2008

Vote vote vote.

Tomorrow is election day. I'm extremely nervous and excited at the same time. I would love for Barack Obama to win, but no one actually knows what will happen do we?

Anyway to try and get rid of some of my nerves, I made cookies last night.

Obama cookies!

My sister Laura and I are voting together tomorrow and I urge you to go with family members and friends if you can. I think it makes it more fun, more like an event. It'll be the first presidential election she votes in so yay!

Obama cookies!

No special recipes used here, just this dough from Epicurious and instead of a normal liquidy frosting for these I made a buttercream with extra milk so it would be easier to pipe the decorations.

But the point of this post isn't about cookies, it's about voting. You all know who I'm voting for. :D

Obama cookies!

Thursday, October 16, 2008

Pumpkin x 2.

So listen, for as much as I say I hate fall, and I really do, I really love pumpkin. I love pumpkin pie, pumpkin bread, pumpkin muffins, pumpkin cake. I think it's a fantastic ingredient that's easy to work with coming out of a can and it makes everything so lovely to eat. Especially since it's associated with the holidays, it gets combined with my favourite spices of cinnamon, nutmeg, ginger, and cloves very often.

This past Sunday for brunch I made the pumpkin scones here on seven spoons. They were fantastic. I didn't change a thing about the recipe and neither should you. (I did however top them with half and half and sprinkle with turbinado sugar. Why not?)

Pumpkin Scones. (raw)

Today I decided to use up the rest of the pumpkin from that recipe (it freezes great, just thaw it overnight) and make a pumpkin cake. This cake is so easy peasy you won't believe it. It's from Elinor Klivan's The Essential Chocolate Chip Book and the only thing I did differently was increase the amount of spices used. (PS if you haven't heard of her yet, get everything she's written - ASAP.)

Pumpkin Chocolate Chip Cake With Cream Cheese Frosting.

Pumpkin Chocolate Chip Cake with Cream Cheese Frosting

Cake:
1 1/2 cups AP flour
3/4 teaspoon baking powder
3/4 teaspoon baking soda
1/2 teaspoon salt
2 teaspoons cinnamon
1 teaspoon ground ginger
1 cup canned pumpkin
1 cup sugar
1/2 cup canola oil
2 large eggs
2 cups chocolate chips

Start off by preheating the oven to 325 degrees F. and greasing a 9x9 inch baking dish.

Sift together the flour, baking powder and soda, salt and the spices. I like to use a piece of wax paper so I don't have another bowl to wash.

Then in a mixing bowl combine the pumpkin, sugar and oil. Then mix in the eggs one at a time until everything is combined. Stir in the dry ingredients thoroughly and then the chocolate chips until they're just mixed through.

Pour into the baking dish and pop it in the oven for 40 minutes. Mine literally took just 40 minutes until a toothpick came out clean.

Frosting:
1 stick unsalted butter, softened
4 ounces cream cheese, softened
Pinch of salt
1 teaspoon vanilla extract
1 3/4 cups powdered sugar

In a mixing bowl, cream the butter and cream cheese with the salt and vanilla until everything is creamy. Then add the sugar and beat slowly until incorporated, and then at a higher speed to lighten the frosting.

When the cake is cool, you can either take it out of the pan or leave it in and ice it with the frosting. I like lots of swirls on my cakes. This is supposed to make 12 squares or probably more like 8.

Pumpkin Chocolate Chip Cake With Cream Cheese Frosting.

Tuesday, October 7, 2008

More apples, apples, apples.

Szarlotka (Polish Apple Tart).

Sometimes after a week of many hours at work, you just feel like doing some cozy things in the kitchen. Obviously one of my favourite things to do is read cookbooks so as I was going through one of the best - Classic Home Desserts by Richard Sax. I first came across a picture for Polish Apple Tart, which was lovely and gorgeous. So I flipped to the recipe to find that it seemed rather feasible for 9 PM on a Saturday night. So here it is. This pastry is not flaky, but it's delicious and supports the chunky apple puree very nicely.

Szarlotka (Polish Apple Tart).

Szarlotka (Polish Apple Tart), recipe adapted from Richard Sax's Classic Home Desserts

Dough:
1 2/3 cup AP flour
2/3 cup sugar
1/2 teaspoon cinnamon
1/4 teaspoon salt
1 large egg
2 tablespoons butter melted or oil
1/4 cup milk
1 teaspoon vanilla extract

Sift the dry ingredients into a large bowl, and then make a well in the middle of them. Combine the egg, butter or oil, milk and vanilla into a small bowl and then pour this into the dry ingredients. Stir with a fork until a soft dough comes together. Refrigerate this for at least an hour.

Filling:
6 large apples - I used all McIntosh and it turned out just lovely. I think you could use any nice cooking apple here or as the author suggests, 3 McIntosh and 3 Granny Smiths. So balance tart and sweet apples.
2 tablespoons unsalted butter (not called for originally but I figured what could it hurt? ;)
1/4 cup sugar
1 teaspoon mixed spices - I used 1/2 teaspoon cinnamon, 1/4 teaspoon nutmeg and 1/4 teaspoon ginger

Place the apples and butter in a large saute pan over medium heat, and cover until the apples start to sizzle. Then increase the heat slightly and stirring frequently, cook the apples until they are very tender, about 20 minutes. Add the sugar and spices and then smoosh the apples with the back of the spoon. Set aside to cool.

Preheat the oven to 350 degrees F. Butter a 9-inch tart pan and pat about 2/3 of the dough into the bottom and up the sides of the pan. Spread the filling over the dough.

Using either parchment or wax paper, place the dough on a floured surface and pat it out until about 1/8 to 1/4 inch thick. Cut 3/4 inch wide strips and carefully lift the strips of dough with a spatula and arrange them in a lattice pattern on top of the filling.

If you want, you can sprinkle the tart with some granulated sugar and then pop it into the oven to bake for about 45 to 50 minutes, until the dough is golden brown. Cool on a wire rack and then sprinkle with confectioner's sugar before serving.

Fantastic with coffeeeee.

Szarlotka (Polish Apple Tart).

Wednesday, October 1, 2008

Baking cravings.

Chocolate Chocolate Chip Cookies.

As much as I hate on fall, I think most of my fondest baking memories occur around this time. On my days off from work in the fall, I always have the strongest desire to bake. I don't know if it's because I need comfort from the fact that it's not summer or because in the summer I don't necessarily crave to eat as much. Anyway, sometimes it's the most difficult thing in the world for me to decide on what to bake. I can look at cookbooks and websites all day long but still nothing will appeal to me. So today I was going through my favourite blogs, some I haven't been to in a while and I came across this recipe on Orangette. It was perfect. I had all the ingredients already, and even some of the additions Molly suggests.

Chocolate Chocolate Chip Cookies.

Therefore, I followed her recipe pretty much as is, but I added about 1/4 cup toasted walnuts and 1/4 cup dried cherries to the batter along with the chocolate chips, and I made them perhaps just a bit smaller because I came out with 24 cookies instead of 20.

My adaptation:
1 cup AP flour
1/4 teaspoon baking soda
1/4 teaspoon salt (yes I upped this)
1/2 stick of butter (4 tablespoons)
2/3 cup granulated sugar
1/3 cup brown sugar
7 tablespoons cocoa powder
1/3 cup sour cream (I don't really have yogurt ever, so sour cream it is)
1 teaspoon vanilla extract
1/2 cup chocolate chips
1/4 cup toasted walnuts
1/4 cup dried cherries

First, preheat the oven to 350 degrees. These are snappy so you want to make sure this is the first thing you do.

Then sift the flour, baking soda and salt together in a small bowl and set aside. Put the butter in a large microwaveable bowl and zap until it's just about melted. Add the sugars and cocoa powder, then the sour cream or yogurt and extract. Then I dumped the dry ingredients and the additions (chips, nuts etc.) in all at once and stir until everything is incorporated evenly. Scoop by tablespoons-full onto a parchment or silicone lined baking sheet and bake for about 8 to 10 minutes. Mine didn't take more than 8, probably because they were a bit smaller.

Let cool on the sheet for a few minutes then transfer to a cooling rack. I ate three while still warm though. Perfect with milk or coffee or tea.

Chocolate Chocolate Chip Cookies.  (&Milk!)

Sunday, September 28, 2008

Apples and fall-ish things.

Apple Muffins.

I really don't like fall. I can get into all the other seasons. Winter I have Christmas, the holidays, my birthday to look forward to. Spring is great because the snow will eventually melt and it gets warmer and everything becomes green again. Summer. Glorious summer. It is my favourite. So obviously when fall rolls around it feels like the death of the best season, you know? There are too many changes in September and I've always hated it.

Apple picking, hay rides, pumpkins, Halloween, apple cider. None of these things are very nostalgic for me or bring me much joy I have to say. But sometimes I do feel like the people I live with deserve to have these things that they themselves might enjoy. And also we have a crap load of McIntosh apples sitting on the counter and no one is eating them because it's still kind of warm out at the moment. Plus this is one of the few apple recipes I found not using Granny Smiths. I mean, yes I'm a baker but who actually keeps Granny Smiths around for eating? They don't because they're not meant to be eaten. I only buy them when I'm making apple pie.

Anyway, I promise this will be the last recipe from Carole Walter's Great Coffee Cakes, Sticky Buns, Muffins & More. Well I can't promise anything because sometimes on Saturday nights I have a desire for something with a buttery crumb topping and this is the book I immediately go to. But hopefully I'll be doing more of a variety of baked goods now that the heat won't prevent me from baking. Maybe.

Just a note this recipe originally called for a different crumb topping, something called "country crumb topping" which included whole wheat flour, oatmeal and things that sounded good and fine but much too much for my sleepy brain to think about when all I wanted were buttery crumbs. Therefore I went for the rustic maple pecan streusel on the page next to it. Much more my thing anyway :D

Apple Muffins with Maple Pecan Streusel
Recipes from Carole Walter's Great Coffee Cakes, Sticky Buns, Muffins & More
(Both these recipes originally call for dark brown sugar. I would have used it if I had it but light brown worked just fine in both cases.)

Streusel (make this first):
7 tablespoons butter
1/2 teaspoon maple extract
1 1/4 cups AP flour
1/3 cup brown sugar
1/3 cup granulated sugar
(I added 1/2 teaspoon cinnamon)
1/4 teaspoon baking powder
1/4 teaspoon salt
1/2 cup toasted pecans, chopped a bit

Place the butter in a small saucepan and heat until almost melted and add the extract. Set it aside and let the rest of it melt and cool down a bit. Add the other ingredients and stir with a fork until crumbs form. Set aside until you need it for the muffins.

Apple Muffins.

Muffin batter:
3 medium McIntosh apples (about a pound) peeled, cored, and chopped into small pieces
1 3/4 cup AP flour
1 teaspoon baking powder
1/2 teaspoon baking soda
1 teaspoon cinnamon
1/2 teaspoon nutmeg
1/2 teaspoon salt
2 large eggs
1 cup brown sugar
2 tablespoons honey
1 teaspoon vanilla extract
1/4 cup butter, melted and cooled
2 tablespoons canola oil
1/2 cup raisins
1/2 cup toasted pecans, chopped

Originally the recipe says you can peel and core the apples and then chop them in the food processor. If you're that lazy, go for it. But I am never opposed to a little chopping with a chef's knife and in this case it makes no difference whatsoever.

So anyway, preheat the oven to 375 degrees F, paper some muffin cups (this made 18 for me, the recipe says 16 though) and sift the dry ingredients together and set them aside. In the bowl of an electric mixer fitted with the whisk attachment, whisk the eggs until they're lighter in colour on medium high speed, about 2 minutes. Add the brown sugar and whisk again for another minute. Add the honey and the vanilla and then combine the butter and oil. Now you want to add this to the eggs and basically emulsify the situation, so drizzle them in very slowly, making it take about a minute. Add the apples, raisins and pecans, stir and then add the dry ingredients all at once and stir until combined.

Portion the batter out into the cups. It can really go almost to the top and it won't overflow, promise. Then crumble the streusel on top. Each muffin can get a generous amount. Bake in the preheated oven for about 20 to 25 minutes, rotating the pans for even browning halfway through.

Let cool or don't and enjoy. These are good enough that I forget it's fall anyway.

Apple Muffins.

Sunday, September 7, 2008

Last of summer.

Blueberry Streusel Muffins.

So originally for brunch this weekend I was going to make this because I haven't made cinnamon buns in forever but I didn't have the time or energy to do so. However, we also had a container of blueberries sitting in the fridge. Being that it is still TECHNICALLY summer, I decided to use the blueberries instead. I really hate fall by the way.

Anyway, this recipe is from Great Coffee Cakes, Sticky Buns, Muffins & More by Carole Walter. I have used a couple recipes so far from this book since I bought it and every one has been really great, espcially because they've all used her favourite streusel recipe. Here's my adaptation.

Streusel:
7 tablespoons unsalted butter
1 cup AP flour
1/2 cup sugar
1/2 teaspoon ground cinnamon
1/4 teaspoon baking powder
1/4 teaspoon salt

In a medium sized sauce pot, melt the butter over low heat until it's almost melted. Take it off the heat and let it cool to tepid.

Sift the flour, sugar, cinnamon, baking powder and salt in a small bowl. Add this to the tepid butter and stir with a fork until large lumps form and it's crumbly. Set aside.

Muffin batter:
1 3/4 cups AP flour
1/2 teaspoon baking powder
1/2 teaspoon salt
1/4 teaspoon baking soda
2/3 cup unsalted butter, slightly firm
(at this point lemon zest was also called for, I didn't use any and they were still superb.)
3/4 cup sugar
1 large egg
1 teaspoon vanilla extract
1/2 cup sour cream (originally called for buttermilk, either works, or even yogurt.)
1 1/2 cups fresh blueberries, rinsed and dried well (I had about 6 ounces, worked fine.)

Preheat the oven to 375 degrees F. Line fourteen muffin cups with paper liners and set aside.

Sift together the flour, baking powder, salt and baking soda. Cut the butter into chunks and put this in the bowl of an electric mixer fitted with the paddle attachment. Beat until smooth, then add the lemon zest if using and the sugar, then the egg and vanilla.

Add the flour and sour cream or buttermilk alternately beginning and ending with the flour mixture.

Using just over half the batter, scoop spoonfuls into the bottom of the muffin cups. Then on top of this add the blueberries, I think I ended up using about 8 or 9 berries per muffin. Then using the rest of the batter, spoon a dollop more on top of the berries. It's okay if the berries are showing. Sprinkle the streusel over each muffin generously.

Bake for about 20 to 25 minutes, although yours might take longer. The streusel should be golden brown and when a toothpick is inserted into the muffin it should come out clean. Cool on a wire rack, although these are great warm with coffee or tea. These are definitely fork muffins though - they can get very crumbly - but that's the best part :D

Blueberry Streusel Muffins.

Tuesday, August 19, 2008

Warning, there may or may not be a recipe in this post. Begin rant:

People don't bake in America. I mean, there are plenty of people that bake at home like me and people that might read this blog okay. But as far as real baking in bakeries go? These institutions are few and far between.

I would absolutely adore working in a real bakery. Maybe it's this area, maybe it's because I haven't searched hard enough but these aren't easy to find. By real bakery I mean bakeries that make their own pie crust for their own pies, make their own filling for those pies. Icings and buttercreams do not come shipped in buckets and cakes do not come in frozen. And for me, maybe it's not just that these things taste better when made from scratch, but the whole point of baking is creating these things in the first place. Taking the time to measure out the ingredients, using the method to put everything together to get a final result. Yes baking is about eating and enjoying, but for me baking is also about this process.

I understand if people at home buy cake mixes and frosting in a can, that's fine. We're all busy, stress is high, and if you want a cake, you want a cake. But from a bakery I would expect more. Perhaps I was spoiled as a child. My mother never bought anything from a bakery. When you buy something from a bakery, don't you expect more? You can't create something on your own so you trust them to do it for you, better even, right? Well if a bakery is using pie filling made with half corn syrup and half stabilizers and a few frozen strawberries, how can this be the case?

Anyway, I suppose this all stems from me being frustrated working in this industry. At least in restaurants we made every sauce, mashed our own potatoes, chopped fresh parsley. Some convenience ingredients are used still, but they are expensive and restaurants know this. Why buy sliced mushrooms when you can have the prep-cook slice them for you? That's the way things should work in a bakery. In my. Opinion.

/Rant.

Sunday, August 3, 2008

They say you just have to keep whipping...

Sweaty eggs.

So I guess I haven't mentioned it before but I'm making my brother's wedding cake. The wedding is this Saturday August 9th. So since the beginning of July I've been stocking up on making batches of frosting and freezing it, baking off cakes and freezing them, practicing on them. (Which is why nothing has been posted here.) But today as I was making batch No. 1,000 of frosting I realized I should be documenting this. If not for me to remember then for the good of the internet people out there also making a wedding cake or something like it.

So part one is buttercream. I have actually made this type of frosting before but not in such quantity so it was a bit nerve wracking. (What isn't for me though?) Anyway the first frosting I made back in May for testing was from Tish Boyle's cake book, but I decided to go with this recipe from Anna Olson (Inn On The Twenty cookbook - great stuff) instead because the quantities were easier to multiply and it was being used on a wedding cake anyway, therefore I knew it would hold up well. This recipe is very looooosely based on hers. I wanted mine sweeter so I upped the sugar a bit and added vanilla, a pinch of salt. Anyway this frosting is amazing and highly recommended. It gets way too butter-like when refrigerated but it's fantastic at room temperature. Or right out of the mixing bowl.

So for step one:
In a small saucepan measure out 1 cup of water and 1 cup of sugar. Stir a bit to dissolve the sugar in the water and start to cook it on high. You want this to eventually become very syrupy and to reach 240 degrees F.

Sugar syrup.

Step two:
In the bowl of a stand mixer, place 8 egg whites, a pinch of salt and 1/8 teaspoon cream of tartar. Whip until soft peaks form, then add 1 cup of sugar until stiff peaks form.

Meringue/finished.

Step three:
Once the syrup has reached 240 degrees F, drizzle it slowly into the egg whites while the mixer is going at medium speed. Add 1 tablespoon of vanilla extract and whip for about 10 to 15 minutes, until the mixture has cooled down.

Meringue after the syrup is added.

Step four:
This part is pretty insane - start adding 6 sticks of room temperature butter, I like to go one stick at a time until it's incorporated. Then comes the scariest part of all... it will look as if you've ruined the frosting most likely. It will be liquidy and not like frosting at all. But you HAVE to keep whipping it. It will come together eventually. The butter will solidify once again and it will be fluffy like a buttercream.

Six sticks of butter.

Voila. I think this might be awesome used on cupcakes also. Spreading it is pretty easy and it doesn't have a tendency to get too many air bubbles involved.

Wednesday, June 25, 2008

What do to when you should be thinking about something else in life.

Chocolate Oatmeal Cupcakes with Cocoa Espresso Buttercream.

Oh that's easy. Make cupcakes. In this case I decided to search the interweb for an "oatmeal cake" and came up with a recipe something like this. Only I made them into about 18 cupcakes instead of 2 9-inch layers. You could do either and whip up a slightly more creative frosting than this one and have yourself a real winner.

Chocolate Oatmeal Cake with Cocoa Espresso Buttercream

Chocolate Oatmeal Cupcakes with Cocoa Espresso Buttercream.

Cake:
1/2 cup unsalted butter, at room temperature
1 1/2 cups granulated sugar
2 large eggs
2 teaspoons vanilla extract
1 cup AP flour
1/2 teaspoon salt
1 teaspoon baking soda
1/3 cup cocoa powder (the recipe said Dutch processed was preferable. I used natural because it wasn't ;)
1 cup sour cream (originally called for buttermilk, I didn't have any.)
2 cups quick-cooking oats
1 handful of chocolate chips or chunks if you want

Preheat the oven to 350 degrees F and line a couple cupcake tins with papers.

Cream the butter and sugar together until fully incorporated. The mixture will look a little grainy, which is okay. Add the eggs one at a time, beating for about 30 seconds after each one. Combine the flour, salt, baking soda and cocoa powder and add this alternately with the sour cream, ending with the flour mixture. Stir in the oats and chocolate chunks, if desired.

Portion the batter among the cups and bake for about 20 to 25 minutes or until a toothpick inserted in the middle comes out clean. Let cool completely on a wire rack.

Chocolate Oatmeal Cupcakes with Cocoa Espresso Buttercream.

Buttercream:
1 cup unsalted butter, at room temperature
3 cups icing sugar
1/4 cup cocoa powder
1 teaspoon vanilla extract
Pinch of salt
1/4 cup half and half (or milk or water. I have half and half around for my coffee. Yes.)
1 tablespoon espresso powder

Bring the half and half (or milk or water) to a boil and add the espresso powder and stir. Let cool to room temperature.

Put the butter, sugar, vanilla, cocoa and salt into a food processor and blitz until creamy and combined. Then strain in the espresso-steeped liquid (so you don't get too many big granules of espresso - you could use instant espresso powder to avoid this, but I liked the look of the little specks. Like vanilla seeds only not.) and pulse again until it's nice and smooth.

Ice the cooled cupcakes and enjoy! I love chocolate covered espresso beans so they were a natural garnish for these.

Chocolate Oatmeal Cupcakes with Cocoa Espresso Buttercream.

Wednesday, May 28, 2008

1AM Cherry Tart.

1AM Cherry Tart.

1AM. Bored, couldn't sleep. Had some leftover cherries in the refrigerator. (Just a few months left before my brother's wedding and I need to start building up those egg whites for the vats of buttercream frosting I need to make for the cake...) What is it about early morning that I love about being in the kitchen? Maybe it's the fact that no one is around, that I'm creating something while everyone else is asleep. I'm not sure, but I do know this tart came out very beautifully. I made the tart dough using my hands because I didn't want to turn on the food processor, but I'm sure that way is much easier. But perhaps a bit less satisfying.

These recipes are slightly based on the ones in Dorie Greenspan's book "Baking: From My Home to Yours" and if you want to do things the right way, you should probably follow her instructions instead. I am allergic to doing things the way they say in a cookbook, apparently.

Sweet tart dough:
1 1/2 cups AP flour
1/2 cup confectioner's sugar
Pinch of salt
1 stick plus 1 tablespoon unsalted butter, cold, cut into small pieces
1 egg yolk

Stir together the flour, sugar and salt until combined evenly. Drop the butter on top and start pinching the pieces with your fingers until you have almost combined the butter with the dry ingredients... a few pieces looking like oatmeal, a few looking like peas. That's okay. Add the egg yolk and combine with your hands until a ball of dough forms. Press this into a lightly greased 9-inch tart pan and freeze it for about 20 minutes to a half hour. Or until the oven is done preheating to 375 degrees, like I did.

Bake for about 20 to 30 minutes, or until dark golden brown around the outside and almost golden brown in the middle of the tart.

Pastry cream:
2 cups whole milk
6 large egg yolks
1/2 cup sugar
1/3 cup cornstarch
1 pinch salt
1 tablespoon vanilla bean paste
1/2 stick unsalted butter cut into pieces

Bring the milk to a boil in a medium saucepan. Meanwhile, whisk the egg yolks, sugar, cornstarch and salt together until combined well. Drizzle in about a 1/4 cup of the hot milk to temper the yolks and whisk. Then add the rest of the milk slowly, and eventually add this mixture back into the saucepan. Bring to a boil and whisk frequently for about 1 minute until very thick. Add the vanilla and the butter a few pieces at a time until it's all melted and combined.

Scrape into a bowl, press a piece of plastic wrap on top and refrigerate until cold.

For the cherries (or any other berry you might want to use):
2 cups cherries, pitted, cut in half
A few tablespoons red currant jelly (you could use apricot too probably)

Melt the jelly in the microwave or whatever, and then stir in the fruit, and toss to make sure all the fruit is about evenly glazed with the jelly. This will make the fruit nice and shiny, and will also help it to keep a bit longer if you're refrigerating a while before serving.

To assemble the tart, take the tart shell out of the pan and place it on a serving platter or plate. Spoon in the pastry cream, spreading to the edges and mounding a bit in the middle if you have a lot like I did, and then pour the fruit on top, letting it fall naturally where it wants to. I think it looks prettier than being arranged. Dig in and enjoy the fruits of summer.

1AM Cherry Tart.

Tuesday, May 13, 2008

Real Rugelach.

Rugelach.

I live in an area with a high Jewish population. So where I work, many Jewish people come in looking for rugelach. We have something that LOOKS like rugelach, yes. Maybe it even has some cream cheese in the dough. But dear Pete they do not TASTE like rugelach. Granted I'm not Jewish, I'm not an expert on this subject, but I have always made my own rugelach from scratch. It's no more difficult than making any other cookie and homemade are always sooooo much better. I honestly couldn't believe how gross (weird aftertaste, weird texture) the ones are that are baked (they come in frozen) where I work. (As a side note, I can't believe people actually pay $9.99 a pound for cookies!)

Anyway, if you're looking for real rugelach, make this recipe. I've seen versions like this where the cream cheese and butter are creamed together, and then I've also seen recipes where the dry ingredients are mixed together first and then cold butter and cream cheese are added in, like a biscuit dough. Both give delicious results and taste much better than the kind from a store :)

Rugelach (basic dough recipe taken from Tish Boyle's "The Good Cookie")

Dough:
1 1/3 cups AP flour (the original calls for cake flour, I didn't have any, turned out fine with AP)
1/8 teaspoon baking powder
1/2 teaspoon salt
1/2 cup unsalted butter, softened
4 ounces cream cheese, softened
1 tablespoon confectioner's sugar
1 1/2 tablespoons sour cream
1 egg yolk
1 teaspoon vanilla

Sift together the flour, baking powder and salt and set aside.

Cream the butter, cream cheese, and sugar together until very light and fluffy, about 2 minutes. Add the sour cream, egg yolk and vanilla and combine. Add the dry ingredients and stir until everything comes together in a nice dough.

Divide the dough into three equal parts and wrap each in plastic. Refrigerate for 6 hours. (Or actually this is what the recipe says to do. I wrapped each and threw them in the freezer for 1 hour because I'm impatient and wanted rugelach TODAY dammit.)

Filling: You can have lots of fun with this!
3/4 cup any jam you have around (I used raspberry, seeds strained out)
1 tablespoon cinnamon and 1/2 cup sugar, combined in a small bowl
1 cup toasted, finely chopped nuts (I used walnuts and almonds) combined with 1 cup finely chopped dried fruit (I used cranberries)

When the dough has chilled, preheat the oven to 325 degrees F. Working with one piece of dough at a time, roll it out on a floured surface to about 12 inches in diameter. Spread about 1/3 of the jam on the circle, sprinkle with 2 tablespoons of the cinnamon sugar, and about 1/3 of the nut/fruit combination. Press into the jam lightly so it doesn't spill out too much. Using a pizza cutter or sharp knife, cut the circle into fourths, then each fourth into fourths, so you end up with 16 triangles all together. Take each triangle and roll it up starting at the wider end and tuck the little point underneath the roll, then place that side down onto a parchment lined baking sheet. Continue with the other pieces of dough.

Bake each sheet for about 20 to 30 minutes or until nice and golden brown. Let cool on a wire rack. These are good with just about any beverage and although I have a mug of milk in this picture, my drink of choice was actually YooHoo.

Rugelach.

Wednesday, April 16, 2008

Bars bars bars.

Apricot Crumb Bars.

Apricot bars, that is. I like making bars. They're easy and they make a lot (or a little) depending on how small YOU want to cut them. Plus you can basically incorporate any flavours, crusts, and toppings you want to.

To be honest when I get a recipe online or any recipe really, I hardly ever follow it to a T. I like to adapt to my tastes, to the things I already have, and improve the recipe so I absolutely know I'll like the outcome. For example, the original recipe for these bars included no salt. When you bake, you NEED SALT. Yes. It brings out the flavour of everything! Also, the original said to bake/prepare in a 9x13-inch pan, which is great, but the ingredients listed for the filling and crumb topping would never have covered the entire surface of the crust. So this recipe, although I found it online somewhere, I don't feel credit is really necessary because of how much I changed it. I literally changed every single part of it, and I will put THAT recipe here instead of the one I originally found, since that's what gave me the delicious results.

Apricot Crumb Bars.

Apricot Crumb Bars

Shortbread Crust:
1 1/2 sticks unsalted butter, softened
1/2 cup icing sugar
1/2 teaspoon vanilla bean paste
2 cups AP flour
Pinch kosher salt

Preheat the oven to 375 degrees F and line a 9x13-inch baking pan with foil. Cream the butter and sugar together until light and fluffy, then add the vanilla to combine. Add the flour and salt and mix just until a nice ball of dough forms. Press this into the bottom of the pan, and bake for 15 minutes, until golden brown around the edges and in spots in the middle. Cool completely.

Apricot Filling:
3 cups dried apricots
3 cups water
1/2 cup granulated sugar
1/4 cup Amaretto
Pinch kosher salt

Place the apricots and water in a medium saucepan over medium-high heat and cover. Bring to a boil and let simmer for 20 minutes. At this point I used a stick blender to puree the apricots, but you could transfer to a blender or a food processor also. Stir in the sugar, Amaretto and salt. Let cool slightly.

Crumb Topping:
1 cup packed light brown sugar
Pinch kosher salt
3/4 cup AP flour
1/2 cup unsalted butter
(You could really add anything you want to this, cinnamon, almonds, nuts of any kind, oatmeal. Have fun imo.)

Combine the flour, salt and sugar until well-mixed. Cut in the butter until large clumps form.

Finishing the bars:
After the crust has cooled completely, spread the apricot filling over it to cover. Then crumble the topping on evenly and bake at 375 degrees for 25 minutes, or until the crumbs are set. Let cool completely before cutting into squares.

Apricot Crumb Bars.

Thursday, April 10, 2008

Buttermilk Cupcakes.

Vanilla Buttermilk Cupcakes.

The origin for these cupcakes actually comes from the fact that I asked my mom to buy buttermilk for something I was making for brunch but never found the recipe I intended to make. Therefore come Monday, I had an entire quart of buttermilk in the fridge begging to be used. I hadn't made cupcakes in a while so I searched Google for "buttermilk cupcakes" and I came up with a GREAT recipe. These cupcakes are really perfect. They didn't sink, explode, go over the cups, nothing. They rise just above the liners, no more and they don't dip down in the middle after you take them out of the oven.

Here I give you the recipe for these perfect cupcakes. Any frosting would be divine on them - I used up some leftover chocolate cream cheese frosting and caramel espresso buttercream. Have fun with them and be creative!

Vanilla Buttermilk Cupcakes.

Buttermilk Cupcakes recipe from Recipezaar

Ingredients:
6 tablespoons unsalted butter, softened
1 cup plus 2 tablespoons sugar
2 large eggs
1 teaspoon vanilla (I used vanilla bean paste)
2 cups AP flour
2 teaspoons baking powder
1/2 teaspoon salt
2/3 cup buttermilk

Preheat the oven to 350 degrees F, and line a cupcake pan with papers or grease the cups.

Sift the flour, baking powder and salt on a piece of wax paper and set aside. Cream the butter and sugar together until combined, then add the eggs one at a time and beat for 3 minutes on medium-high speed, and then incorporate the vanilla. Beginning and ending with the dry ingredients, add to the butter-egg mixture alternating with the buttermilk. Portion the batter into the baking cups, and bake for about 15 to 20 minutes or until lightly golden brown around the edges and set on top. Let cool completely on a rack before frosting.

Vanilla Buttermilk Cupcakes.

Monday, March 31, 2008

The magic of streusel AKA crumb toppings.

Apple Cheesecake Bars.

Crumb top.

I don't really plan to make things that have similar attributes at the same time, it just happens. For instance this past week I received the book Great Coffee Cakes, Sticky Buns, Muffins & More by Carole Walter from Amazon so that I would never run out of ideas for brunch on Sundays. I decided early Saturday to make one of the first recipes in the book, Butter Crumb Coffee Cake. Looked easy, sounded delicious, and the streusel recipe was intense. I mean, there was a TON of it. And I LOVE streusel, any crumb topping.

Then I remembered about these apples that have been sitting on my counter for a week and a half. I promised myself I'd use them for Easter and never got around to it, so I knew they were almost past their prime, and I'd better use them sooner rather than later. Looked in the fridge, saw a couple packages of cream cheese and then thought "apple cheesecake!" A bit of Googling and I found myself a nice recipe for apple cheesecake bars - that just happened to include a nice recipe for streusel on top. I followed the recipe to a T, except I substituted Tom Sawyer's Gluten-Free Flour for the all-purpose flour called for in the recipe and omitted the oats in the topping (my brother's fiance is a Celiac, her mother wanted me to try this flour. IT IS GREAT! For anyone with wheat intolerance. Try it out for sure.)

Anyhoo, blah blah. Here are the recipes!

Butter Crumb Coffee Cake adapted from Carole Walter's Great Coffee Cakes, Sticky Buns, Muffins & More

Cut.

Streusel:

2/3 cup unsalted butter
1 1/2 cups AP flour
3/4 cup sugar
3/4 teaspoon cinnamon
1/2 teaspoon baking powder
1/2 teaspoon salt

Put the butter in a heavy saucepan and heat until almost melted. Remove from the heat and cool to room temperature.

Combine the flour, sugar, cinnamon, baking powder and salt in a small bowl, and add this to the butter and stir until the mixture forms large crumbs. At this point I put the whole pot in the fridge until the batter was ready.

Batter:
2 cups AP flour
3/4 cup granulated sugar
1 tablespoon baking powder
1/2 teaspoon salt
1/2 cup unsalted butter, cut into cubes and softened
1 large egg
2/3 cup milk
1 teaspoon vanilla extract

Preheat the oven to 350 degrees F, and spray a 10-inch springform pan with baking spray or line the bottom with parchment paper and generously butter the sides and bottom.

In a large bowl, whisk together the flour, sugar, baking powder, and salt. Add the butter and cut it in until the mixture has a very fine crumb texture. In a small bowl combine the egg, milk and vanilla and then add this to the butter/flour mixture, and stir until it is thick and well combined, about 1 minute.

Scrape the batter into the prepared pan and smooth the top out. Then take your streusel out of the fridge and make big clumps of it in your hand, then crumble it on top of the batter, scattering it evenly over the entire thing.

Bake in the preheated oven until the top is golden brown and a toothpick comes out clean, about 35 to 45 minutes. Let cool completely, then take the ring off the springform pan and serve! I like to keep this under a cake dome, seems to stay fresher that way.

Slice.

Apple Cheesecake Bars found on this blog and modified slightly.

Crust:
2 cups AP (or gluten-free) flour
1/2 cup firmly packed brown sugar (I used dark brown mm)
1 cup unsalted butter, softened

Preheat the oven to 350 degrees F, and grease a 9x13-inch baking pan.

Combine the flour and sugar until there are no more lumps of sugar left. Add the butter and mix until the butter is nicely distributed throughout. Press this into the bottom of the pan. Bake until it is golden, about 15 minutes.

Streusel:
1 cup firmly packed brown sugar (again I used dark brown)
1 cup AP (or gluten-free) flour
1/2 cup unsalted butter, softened

Combine the sugar and flour, and then cut in the butter until coarse crumbs form. Set aside.

Apples:
4 large Granny Smith apples, peeled, cored and diced
2 tablespoons sugar
1 teaspoon cinnamon
1/2 teaspoon nutmeg
1/4 teaspoon ginger (I added this)

Stir the sugar, cinnamon, nutmeg and ginger together, then pour over the apples and stir well to combine.

Cheesecake Batter:
2 8 ounce packages cream cheese, softened
1/2 cup sugar
2 large eggs
2 tablespoons Amaretto (or 1 teaspoon vanilla)

Beat the cream cheese and sugar until lump-free. Add the eggs one at a time, and then the Amaretto or extract and beat on low speed until everything is incorporated.

When the crust is out of the oven, pour the cheesecake batter on top, smoothing to the edges. Then top with the apples, and then finally, the streusel. Bake in the preheated oven for about 30 to 35 minutes, or until the cheesecake batter looks set. Chill thoroughly, cut into bars, and enjoy!

Apple Cheesecake Bars.

Thursday, March 20, 2008

Anniversary Cake.

Chocolate Chip Cake with Vanilla Bean Buttercream.

I've been baking. Just not blogging.

Anywho. Today my sister Laura and her boyfriend Morgan are celebrating two years together. Aww young love is the best, right? Really though it gives me the excuse to bake something a bit fancier than normal so whatever. She requested a chocolate cream pie (I made some chocolate cream tartlettes, recipe to come soon), but I really wanted to make something I could write on top of. AKA a cake. She's not a huge cake fan, but he'll eat anything. So this might seem a rather generic cake, but it tastes much more than generic.

Chocolate Chip Cake with Vanilla Bean Buttercream. Cake recipe found on some website somewhere and modified muchly.

Chocolate Chip Cake:

¾ cup chopped semisweet chocolate (not chips, they'll sink. Mini chips might work, though.)
1 ½ cups all-purpose flour
1 teaspoon baking soda
Pinch salt
¾ cup sour cream
¼ cup plus 2 tablespoons milk
½ cup butter, softened
1 cup plus 1 tablespoon granulated sugar
1 large egg
1 teaspoon vanilla
Preheat oven to 350 degrees F.
Sift together the flour, baking soda and salt.
Combine the sour cream, milk and vanilla. Cream together the butter and sugar until light and fluffy. Add the vanilla and egg, and mix until the mixture is smooth. Stir in the flour and sour cream mixture, alternatively beginning and ending with the flour. Fold in the chopped chocolate.
I used two round 8-inch cake pans here, and it was pretty perfect batter-wise. You could probably use one 9x13 for a sheet cake or 1 10-inch round cake pan. Bake until golden brown around the edges and risen in the middle, or until a toothpick comes out clean when tested in the middle of the cake. My 8-inch cakes took about 25 minutes.
Vanilla Bean Buttercream
1 cup unsalted butter, softened
1 teaspoon vanilla extract
1 teaspoon vanilla bean paste
4 to 6 cups powdered sugar
1/4 cup half and half
Beat the butter until very smooth and creamy. Add the extract and paste, and mix to combine. Add the sugar a cup at a time, and adding in the half and half when it looks too dry. Taste for sweetness as you go, adding more sugar if you need to. Mix on high speed for about 3 minutes until very light and fluffy.

Ice the cake any way you wish! I garnished this with chocolate chips on top and some chocolate hearts I made with melted chocolate.

Chocolate Chip Cake with Vanilla Bean Buttercream.

Sunday, March 9, 2008

Bored Baking.

Shortbread Squares.

I really have no idea what prompted it but last night around 11:30 I went downstairs to the kitchen and started pulling out butter, sugar, and flour and made this shortbread. It may have been the weather, it may have been my boredom, or knowing that I didn't have to be up early this morning. Whatever it was I'm glad I did it because this is my favourite shortbread recipe. Growing up my mom's favourite cookie was shortbread always, always. And really what's better than eating butter and sugar, combined with JUST enough flour to hold it all together and a pinch of salt? I love shortbread because it truly displays baking as more than just the sum of its parts.

Plus it happens to be the best accompaniment to coffee or tea. Or orange juice, or milk, or water...

Shortbread recipe adapted from "Tartine" by Elisabeth M. Prueitt and Chad Robertson

Shortbread dough:
1 cup plus 2 tablespoons unsalted butter, VERY soft. (Should have the texture of mayonnaise when mixed in bowl)
1/2 teaspoon salt
1 3/4 cups plus 2 tablespoons AP flour
1/2 cup plus 2 tablespoons cornstarch
1/3 cup granulated sugar (I used vanilla sugar)
1/4 cup granulated sugar or superfine sugar for topping

Preheat the oven to 325 degrees F. Butter a 6x10-inch glass baking dish. (PS I used an 11x7 'cause I don't have a 6x10. Came out fine.)

Place the butter in a mixing bowl. Add the salt to the butter and mix well with a spoon or paddle attachment so that it dissolves completely before the other ingredients are added in.

Sift the flour and cornstarch together on a piece of wax paper or in a small bowl. Add the sugar to the butter mixture and beat until it's just combined. Then add in the flour mixture and stir until just a smooth dough forms.

Pat the dough evenly into the prepared baking dish. The dough should be fairly thin in the dish - no more than about 1/2 inch thick. Bake until the top is slightly golden, but the center is still light, about 30 minutes. Let cool until warm to the touch.

Sprinkle the sugar on top of the baked shortbread and shake the dish to coat the entire surface. With a paring knife, cut into desired pieces. Let cool completely and then remove the square or rectangles from the dish. The first is always the hardest to get out so obviously just eat that one yourself. This recipe says the cookies last for 2 weeks in an airtight container but mine are almost gone already. They are that good.

Shortbread Squares.

Saturday, March 8, 2008

Use What You've Got : Carrot Cupcakes.

Carrot, Golden Raisin, Orange, Pecan and Coconut Cupcakes.

It hasn't stopped snowing now for at least 48 hours. And it gets tiring. All the shoveling, winter driving, making sure you have enough gas in your car in case you get stuck in a ditch somewhere.

So generally when I don't have to go anywhere during this time of year I don't. (basically I become a hermit) Actually, it's March now right? Usually this happens around January or February but you never know here in Buffalo. We're going through quite the storm and it will be (TECHNICALLY) spring in two weeks. But to get to the point I don't exactly have the nerves to get in my car and drive to the store to get stuff when I need it when baking. I use what I have.

I really dislike when people on recipe sites (epicurious.com coughcough) make a recipe, then rate it with 5 out of 5 stars when they substitute every ingredient for another ingredient... it's hardly the same recipe anymore! However cooking and baking are about using what you've got ultimately in my opinion. Cooking moreso, but when it comes to add-ins in baking I say why not. Therefore in this carrot cake I used pecans, not walnuts. I used melted butter, not canola oil or some fancy walnut oil (like one recipe I came across called for.) So here is my version of carrot cake. Loosely based on the one from Elinor Klivan's book "Cupcakes."

Carrot, Golden Raisin, Orange, Pecan and Coconut Cupcakes.

Cupcake batter:
1 cup AP flour
1 teaspoon baking soda
1/4 teaspoon salt
1 teaspoon ground cinnamon
2 large eggs
3/4 cup sugar
2/3 cup canola or corn oil (used melted butter, as mentioned. came out lovely.)
1 teaspoon vanilla extract
2 teaspoons grated orange zest
1 cup finely grated carrots
3/4 cup golden raisins (I'm sure you could add whatever you want here if you're not a raisin fan. I considered dried cranberries and/or apricots for example.)
1/2 cup coarsely chopped walnuts (pecans IMO)

Preheat the oven to 325 degrees F. and line a 12-cup muffin pan with papers.

Sift the flour, baking soda, salt and cinnamon onto a piece of wax or parchment paper and set aside. In the bowl of an electric mixer fitted with the whisk attachment, beat the eggs and sugar until smooth and thick, about 1 minute on high speed. On low speed mix in the oil or butter, vanilla, orange zest until blended. Mix in the flour, carrots and other add-ins here and blend until just combined.

Fill each cupcake paper with about 1/4 cup batter and bake until the tops are firm and a toothpick inserted in the middle of each one comes out clean, about 28 minutes. (I think mine took about 24. Check early, they burn easily.)

Cool the cupcakes completely on a wire rack.

Orange Coconut Cream Cheese Frosting:
(These would be totally rad with just regular cream cheese frosting also I'm sure. I had to use up some coconut stuff that was in the freezer.)
1/2 cup unsalted butter, softened
6 ounces cream cheese, softened
1 teaspoon vanilla extract
3 to 4 cups icing sugar
1 cup sweetened flake coconut
1 teaspoon grated orange zest

Beat the butter and cream cheese until smooth and combined. Then add the vanilla and powdered sugar and beat on medium until well blended. Add the coconut and orange zest.

I liked these to be kind of home-y looking. I originally used a star tip to pipe the frosting on but it reminded me too much of a bakery I used to work at so I got my little icing spatula out and swirled away. Have fun with the garnishes on these. (I considered making these carrot sprinkles from Cupcake Bakeshop but didn't have enough time.) I used a toasted pecan half and toasted coconut that I then whizzed up in the food processor until it was a bit finer. I absolutely love these cupcakes and I hope you do too.

Carrot, Golden Raisin, Orange, Pecan and Coconut Cupcakes.